
Technology, Tools and Tips for Active Learning: Five Innovative Ideas for Integrating Technology with Your Teaching
Tab Betts
Where should we begin with integrating technology into teaching? A perennially difficult question, because, particularly in the world of technology, the best starting position is constantly changing, as the landscape of the future forms and reforms in a kaleidoscope of possibilities. Sometimes, in order to understand the future, it can be surprisingly helpful to consult the past. According to the sagacious aphorisms of the Chinese philosopher Lao Tzu, it is getting started rather than how you start that matters, as “the journey of a thousand miles begins with a single step”. This is also true when it comes to teaching with technology, but the first step can be daunting.
In this chapter, I will attempt to provide some guidance in doing this, by presenting 5 real examples of how technology can be applied innovatively to enhance teaching and learning practice. The examples are drawn from my collaborations not only with a variety of colleagues at the University of Sussex, but also collaborators from far beyond, spanning geographically from Brighton & Hove in the United Kingdom, to Abuja, Nigeria and Phnom Penh, Cambodia. To give a glimpse of what will be covered in the chapter, here is a list of the examples which will be explored in more detail below. If you are reading a version of this text with hyperlinks, then you can navigate directly to the relevant section by clicking on the link.
- Community: Build your learner community using social media as a platform for out-of-class learning;
- Self-direction: Encourage self-directed learning by using hyperlinks to create interactive presentations and resources;
- Creativity: Task learners with time-pressured multimedia creation challenges – such as a Podblast, Booksprint or Videoblast;
- Assessment: Take a structured approach to formative assessment using team-based learning and online quizzes;
- Peer-observation: recording, sharing and evaluating experiences using mobile phone cameras and a Padlet wall.
1. Community: Build your learner community using social media as a platform for out-of-class learning.
Overview
How can you build a sense of community around a module or course you are teaching? How can this be maintained after the teaching has finished? One method is to use social media.
While it certainly has its limitations, social media is a fantastic tool for communication. Not only can we communicate instantly across huge distances, we also have the possibility of sharing almost any form of digital content or multimedia. This can be done on a one-to-one basis with individuals, but it becomes even more powerful when dealing with large groups of people. In this section, I will provide an example of how a social media app, such as WhatsApp, can be used to create a sense of community in the context of teaching and learning.
My colleagues and I recently implemented this approach when delivering a series of professional development workshops for academics and parliamentary researchers in Nigeria and Cambodia. The first of these took place in September 2018, when a group of teaching staff from the University of Sussex went to facilitate a week of continuing professional development (CPD) and pedagogical exchange in collaboration with the National Universities Commission in Nigeria. The participants came from a number of universities across Nigeria to gather together in Abuja for the week. The second training took place in Phnom Penh, Cambodia, where parliamentary researchers from a number of countries across the Southeast Asia region came together at the former royal residence and senate compound of the Cambodian government to participate in a training programme offered in collaboration with the Parliamentary Institute of Cambodia.
As part of this training, we wanted to encourage sharing between colleagues from different universities and build a community of practice. Our original intention was to do this via the forums on the Canvas Learning Management System (LMS) website that we had created to serve as the virtual learning environment (VLE) for our professional development programme. However, our thinking changed when faced with the real situation. This is a good example of how, both with approaches to teaching and technology, things rarely go according to plan, so we need to be adaptable. For a variety of reasons, using the forums on our Canvas site wasn’t the best solution. For one thing, participants were not familiar with Canvas and did not already have accounts set up. Some of them were having trouble accessing Canvas at all. Also, as Canvas was only going to be used for that training programme, it seemed unlikely that participants would continue to use it after the programme had finished. Having realised these challenges, I began discussing with my colleagues about what we should do. We came up with a few possible alternatives, but in the end we decided that the best thing to do would be to ask participants which platform they would be most likely to use themselves. In the case of Nigeria, it turned out that there was an obvious answer: almost everyone used WhatsApp and were used to using this app both for work and personal contacts. However, when I have worked in China, for example, the best solution by far was WeChat. You will need to ask your learners which platform works best for them and also consider which platform you are comfortable using.

Figure 1: photo of academics who came from a variety of universities across Nigeria to participate in the professional development programme.
The “How to” Guide
For this particular use of technology, it may be helpful to use the ADDIE (Analyse, Design, Develop, Implement, Evaluate) model of instructional design to plan how you use social media to engender a sense of community. The steps are as follows.
- Analyse: Find out what social media platforms your learners already use and how the features of these platforms are able to match their current learning needs.
- Design: Do some light research. Ask colleagues, students and friends for advice about which platform to use and how to set it up. Conduct some online searches about which social media platforms are most popular with your learners and what each platform enables you to do. For example, LinkedIn has a more professional focus and may seem more appropriate than informal platforms such as Facebook, but the two have different features which might be more useful in certain contexts. If you want something public, Twitter or Instagram might be good choices. When in Nigeria, we asked what most people used and it turned out that WhatsApp was the most popular, and it had the features we needed, so we went with that. The downside of WhatsApp is that you need to provide a phone number and this is visible to other users. There is no perfect system, but it is about finding one that works for the context in question. Perhaps the most important aspect is to think about your pedagogical use of the platform in advance. What am I trying to achieve by using this platform? Will it enable me to engage learners in the kinds of learning activities and discussions which will most benefit them?
- Develop: To save extra work for yourself, ask for one or two volunteers to collect contact details from their peers and help set up the group. Follow up with these individuals to ensure that they find a way to get everyone added. To avoid mixing personal and professional, and in the interests of privacy, you may also want to set up a dedicated ‘teaching’ social media account for the purpose of interacting with your learners.
- Implement: Once everyone has been added, make sure that you start using the group as soon as possible. One of the keys here is ensuring that learners are given a reason to contribute to the group, such as providing them with a specific task of something to post. It could be as simple as introducing themselves or commenting on a provided stimulus. However, it is not only important to start the ball rolling at the earliest opportunity, it is also critical that you keep that momentum going once it gets started. This means providing a schedule or regular tasks for what they should share to the group. Once things really pick up speed, you may find that this requires less direct management; however, at the early stages, online groups generally need careful managing if they are to maintain a healthy level of activity in the long term.
- Evaluate: As the community develops, regularly observe how effectively the online group is facilitating learning and a sense of community. Plan for regular checks and summarise key data so that you have an overview of how things are going. If certain types of tasks seem to work particularly well, then be prepared to be flexible and deviate from your original plan. Consult with learners, relevant research and colleagues to keep updating your understanding of how to improve upon what you are already doing.
Benefits:
- Online communities on social media can provide a platform for more democratic and learner-centred discussion
- Makes it easier to contact learners and share multimedia resources instantly
- Allows learning to extend beyond the classroom and for discussions to continue in online spaces
- If managed well, social media groups can contribute to continued application of learning after a course has finished
- Learners can create a support network for each other which may take some of the burden off the instructor
Challenges:
- Access: access to relevant technology and reliable sources of power are needed. In Nigeria, one of the challenges we faced was that every twenty minutes or so the electricity would suddenly go down. This meant no lights, no computer, no projector, no internet and no air-conditioning (in a room packed with people, when the temperature outside is a sweltering 40° Celsius). In a workshop where I was supposed to be training people in how to use technology in their teaching, this presented a formidable challenge, but also a fortuitous opportunity, because it allowed me to demonstrate how to deal with problems when they come up. If learners do not have access to digital devices, a good strategy can be to ask them to work in pairs or groups with only one device per group. Alternatively, ask your institution to fund several devices which can be used by groups. If your institution lacks the funds, you may be able to find a company who might be willing to sponsor your endeavour by providing funds or free devices. For instances where there are frequent power outages, try asking students to complete tasks offline (e.g. using pen and paper) first. Mobile devices with battery can be used to capture the process or products of the activity using photos, video or audio. Then, when power allows, ask them to upload these to a website, cloud storage folder, student response system or Padlet wall to be shared with their peers as a whole group.
- Privacy: Another issue pertains to the management of privacy. As previously stated, it may be a good idea to create a dedicated social media account in order to keep interactions separate from your personal information. It is also important to take steps to protect the privacy of learners by setting some ground rules for interactions within the group, assigning responsibility for monitoring this to certain members of the group and following through by taking appropriate action if any of the rules are broken.
2 Self-direction: Encourage self-directed learning by using hyperlinks to create interactive presentations and resources
Overview
What if teaching didn’t need to follow a prescribed path from A to B, but instead consisted of guiding learners to explore where their interest takes them?
The approach outlined below is one I have used extensively in my own teaching, but have also seen used effectively by numerous colleagues. It is inspired by the concept of heutagogy (self-directed learning) and guided discovery. Heutagogy is a branch of teaching and learning theory which focuses on promoting learner autonomy and allowing the learner to take ownership of both what they want to learn and how they want to learn it. Guided discovery is a related instructional approach in which the primary activity is for learners to explore and find their way through a non-linear scenario or set of problems.
One useful analogy for understanding this method is to compare a traditional book to a website. With the exception of reference books, most books are designed to be linear: the reader is supposed to begin on the first page and continue until the final page following the sequence set out by the author. Websites, on the other hand, tend to consist of a number of individual pages connected to one another via hyperlinks. They are designed so that the user can jump around to the page or section which is most relevant to them and skip any information they consider to be less relevant to their needs.
This has numerous benefits (e.g. economy, efficiency, flexibility, personalisation) and allows the learner to progress at their own pace and design their own path through the learning material, spending as much or as little time as is required for any given activity. While most institutions have virtual learning environments (such as Canvas, Moodle or Blackboard), and there are some relatively easy tools for creating websites, such as WordPress or Wix, there is an even easier way to create a non-linear learning resource. The solution which I use myself and often recommend to others is to create a presentation with hyperlinks between different slides and a title slide, which provides the function of a homepage or navigation slide, with links to all of the different sections of the resource.
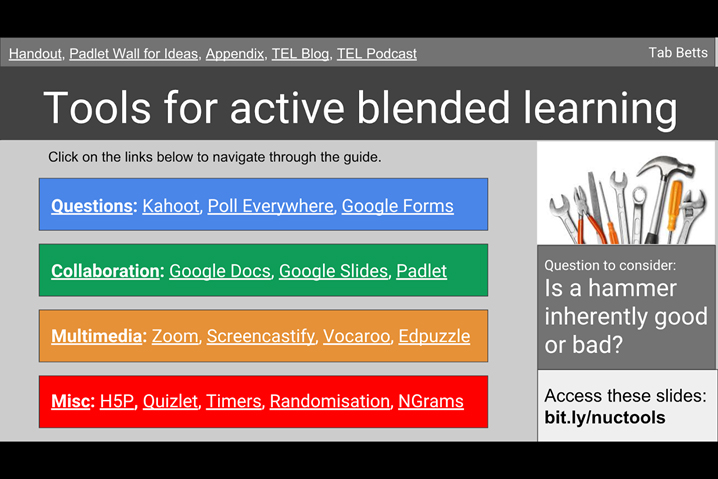
Figure 2: Screenshot of title slide for the self-directed Google Slides presentation I created, entitled ‘Tools for Active Blended Learning’.
The “How to” Guide
I will explain the process using Google Slides, as that is what I used in my own teaching. However, you could easily achieve the same thing using PowerPoint, Sway or any other presentation software which allows you to insert hyperlinks.
Before the session:
- 1. Create a free Google Account.
- 2. Go to http://slides.google.com and create a new presentation.
- 3. Decide on section titles and title slides for each of these sections (e.g. In a session on academic writing, sections might include structure, referencing, critical thinking, etc).
- 4. On the first slide if your presentation, which will serve as the homepage or navigation slide, insert a link to each of the section title slides.
- 5. Create slides in between the section title slides and populate these with the content for each section.
- 6. Create a link to the first slide of your presentation on each of the section title slides. Time-saving tip: you can create one, then copy and paste it to all of the other slides.
- 7. Create a shareable link to the slides and share this with learners. If needed, you can shorten the link by using a URL shortening service such as http://tinyurl.com or http://bitly.com.
During the session
- 8. Introduce the session and the approach briefly. Explain that you will give an overview of the material and then it will be up to learners to choose their own path through it, focusing on what they think will be most useful to them.
- 9. Quickly flick through the slides to give an overview of the full content contained within the resource. This will give them a feel of what their options are in terms of sections to visit later.
- 10. The actual exploration section can either be carried out as a whole class, with members of the class taking it in turns to come up to the front to guide the exploration, or it can be done in smaller groups, with each group being given access to the slides on a digital device. As they explore the material it is important that they are given a task, otherwise the activity can become unfocused. As an example, when I run a workshop which introduces new classroom technologies, one task is to plan an activity for a teaching session using one of the tools and demonstrate the tool in action for other members of the group. Feel free to be creative with the tasks that you set! Note that the key to the instructor’s role in this part of the session is to allow the learners to take control, only offering questions or guidance when it seems like learners get stuck or learning might be compromised. To facilitate this dynamic, I generally seat myself in amongst the learners, at the back of the room or off to one side and nominate a couple of learners to take control at the front of the room. If you have a large touchscreen display, learners can press directly on the hyperlinks in the resource to navigate through it, which makes for a more intuitive experience.
Benefits
- Allows learners to choose the focus and pace of learning.
- Encourages higher levels of learner independence.
- Allows for more flexible learning experiences which respond to the changing needs of the learners and the learning context.
Challenges
- Requires careful setup and management in order to make it work effectively.
- Hard to get the right balance of guiding learners in a useful but not intrusive way and allowing them to the freedom to explore without interruption.
- Instructors and learners may be unfamiliar with non-linear modes of delivery, so encouragement or training may be needed in order to give them confidence using the approach.
Concluding remarks
I have used this approach in a number of professional development workshops for teaching staff, as well as with students across a variety of age groups and contexts. I have found it to be both successful and well received by learners, as long as the resource is designed effectively (e.g. the links all work, the content is appropriate, the content is well presented, the quantity of material is suitable, etc) and the use of the resource us managed effectively (e.g. introduced and explained well, learners are given control of how they explore the resource, instructor provides guidance and answers questions, gently helping learners to make the best use of the resource without prescribing the pace or the method of learning).
If the approach seems daunting or unfamiliar, then try introducing it just for a single activity or small section of a session. Even experimenting by giving the students a website or Powerpoint with hyperlinks for a 10-20 minute section of a session would be a good way to test out whether the approach is suitable for your situation.
3 Creativity: Task learners with time-pressured multimedia creation challenges – such as a Podblast, Booksprint or Videoblast
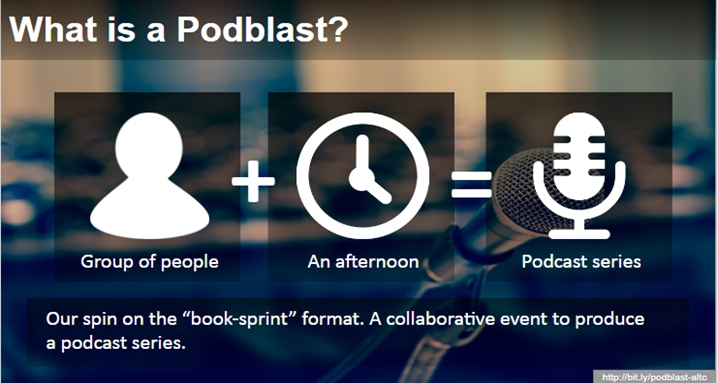
Figure 3: screenshot of a slide created by Pete Sparkes to provide a visual summary of what a Podblast is.
Overview
In 2017, staff in the Technology Enhanced Learning team at the University of Sussex invented the idea of a new type of workshop called a Podblast. The title derives from a portmanteau of the words ‘Podcast’, meaning an online radio show, and ‘blast’, implying that the session is fast-paced, involves an explosive bringing together of ideas but also, and most importantly, is great fun (yes, that’s right… it’s a blast!). In a nutshell, a Podblast involves bringing together a group of complete beginners to podcasting and getting them to create an entire podcast series within a single afternoon.
The “How to” Guide
The session lasts around 3.5 – 4 hours (depending on group size and prior podcasting experience), and is designed to take participants through the various stages of the process step by step.
We begin by introducing the concept of a Podblast and asking members of the group to introduce themselves to one another. After that, we move into the pre-production phase, by providing a theme and talking about how you might plan an episode around that theme. Participants are then divided into teams of 2-3 people and given time to plan their episode together. Following this, we share these ideas as a whole group, trying to decide in which order the episodes should come and adjusting episode plans slightly to ensure overall continuity for the podcast series. Once this is confirmed, it is time for the recording phase. At this point we introduce everyone to the recording equipment, which generally includes a selection of microphones and portable recording devices. I suggest that you prepare a range of equipment (if available), so that people can try different things and choose equipment which is well matched to their level of experience (e.g. a lapel microphone plugged into a mobile phone is generally easier to set up and manage than a laptop with a USB microphone or a portable recorder). If resources are very limited, you could manage to run the session using only mobile phones, as long as you have one phone which can record audio available to each group. Once the equipment has been introduced, groups then go off to find a quiet space in which to record their episode. Following the recording phase, we introduce participants to the basic features of audio editing software and give them time to make some basic improvements, such as trimming the beginning and end of the recording or cutting out any bits where the conversation broke down. Finally, we publish the episodes by uploading them to the internet and have a reflection and recap discussion to recognise what has been created and consolidate the learning process.
I have included the full session plan below to make it easier for you to replicate the process within your own context. Feel free to use or adapt this to suit your needs.
Session Plan – The Great Sussex Podblast
Description
Are you a veteran podcaster, are you just starting out or are you podcast curious? If you answered yes to any of these, then this event is for you. Join us as part of Digital Discovery Week as we embark on the first ever Great Sussex Podblast. During this event you will be given the tools and support to record, produce and create your very own podcast episode.
After an initial briefing, you’ll be ready to start recording. You’ll then be supported to edit your podcast. At the end of the session we will have a collection of individual podcasts that will be scheduled to form a series. That’s right, a whole podcast series created in an afternoon.
Learning outcomes
By the end of the session, participants will be able to
- Work as a group to plan and produce a series of podcasts
- Plan, record, edit and publish an audio recording online.
Criteria
As a group, produce 3+ podcast episodes based on the theme of ‘Digital Discovery’.
Each episode should be 5 to 10 minutes in length.
Session Outline
- Overview of the task
- Set the scene and provide context – What is a podcast, examples of the medium and what we’re hoping to achieve with this.
- Go round and ask delegates for their name, their experience of podcasting, why did they come?
- Planning
- Demonstrate recording and equipment
- Recording
- Talk about editing, show off our premade podcast before and after edit
- Delegates edit their clips with support from us
- Brief overview of publishing
- Delegates publish their clip
- Reflection
| Time | Activity | Resources | Notes |
| Introduction (25 mins) 1pm-1.25pm | |||
| 5 mins | Overview of the task | slides | |
| 5 mins | Provide context | slides | What are podcasts? Why would you produce a podcast? Examples of themes and formats |
| 10 mins | Icebreaker | Who are you? What’s your experience? What do you hope to get out of today? | |
| 5mins | Organise groups | Google Doc | Groups of 3 / 4
Fill in google podcast template document. |
| Planning (20 mins) 1.25pm-1.45pm | |||
| 15 mins | Discuss ideas for themes and formats in groups | Paper, pens | In group think of 3 ideas for episode around theme of digital discovery. Then think about the format they would like to explore this in. |
| 5 mins | Coordinate episode themes and formats | Google Doc | Fill in google podcast template document. |
| Recording (1hr) 1.45pm-2.45pm | |||
| 5 mins | Give overview of recording equipment and software. | 4x USB Headphones w/microphone
2x dual headed lapel mics 1x Snowball mic 1 x Samson mic |
|
| 5 mins | Advice on recording | Advice on how to record ie checking you can hear everyone, not worrying too much about silence or perfectionism, talking one at a time. | |
| 5 mins | Demonstration of recording | Audacity & usb mic | |
| 30-45 mins | Groups record their podcast with support from us. | ||
| Editing (1 hr) 2.45pm-3.45pm | |||
| 5 mins | Brief explanation and advice on editing | ||
| 5 mins | Demonstration on editing using Audacity | ||
| 30 -45 mins | Groups edit their podcast with support from us | ||
| Publishing (20 mins) 3.45pm-4.05pm | |||
| 10 mins | Talk about publishing and marketing your podcast briefly. | ||
| 10 mins | We publish on Soundcloud and demonstrate how you do this | TEL Soundcloud account login details | |
| Reflection and wrap- up (25 mins) | |||
| Group discussion | 1. What are your main takeaway points from today?
2. Have you got any ideas about how you could take this forward in the future? 3. Podcasting group? |
||
Although the example here is a Podblast which focuses on audio recording and publishing, you could easily adapt this process to work with other kinds of multimedia, such as text in the form of a booksprint, where participants produce a book in a short space of time, or a videoblast, where participants create a series of videos in a short space of time. It is likely that you will have many of your own ideas about how this could be best adapted for your own context.
Benefits:
- Very efficient and concentrated learning process, taking participants from no prior experience to being able to create something in a very short space of time
- Strong sense of achievement for learners, as they have demonstrable products – an Individual episode and collective series – to show as a demonstration of their learning during the session
- It can develop learners subject knowledge and digital skills, whilst also being a rapid way to create content which can be used for other purposes
Challenges:
- It takes some time to plan and set up an activity like this. Testing the equipment and learning the software in advance is extremely important.
- As there is a high level of challenge for learners, there is also a considerable demand for support from the instructor. As such, the approach might be difficult to implement with larger groups of learners.
- Although you by no means need to be an expert, it does require the instructor to learn and develop their own digital skills alongside the learners
4 Assessment: Take a structured approach to formative assessment using team-based learning and online quizzes
Overview
One key way that technology can enhance learning is through facilitating the process of formative assessment. By formative assessment, we mean the use of assessment to support learning, rather than merely to evaluate it. One of the most systematic and easy-to-implement ways to integrate formative assessment into your teaching is to use a structured approach where students are regularly given opportunities for self- and peer-assessment, as well as receiving feedback from their tutor. Although it can help to motivate learners towards taking the task more seriously, it is not essential for these assessments to contribute to their final grades. The important thing is that opportunities for assessment are implemented in a structured way and occur regularly, drawing on the idea of just-in-time feedback, where feedback is considered to be more valuable if received as soon as possible after the activity which is being assessed.
So what pedagogical approach can help us to structure opportunities for formative assessment, while also allowing us to enhance the process using appropriate learning technologies? You are probably familiar with the idea of flipped learning, also referred to as the flipped classroom. The idea is basically that subject content can be presented outside of class time, prior to the session, through a range of media (articles, videos, audio, infographics, etc), accompanied by tasks or questions which test the learners’ understanding of the material. In-class time, then, focuses on learner-centred tasks and interactions, with the instructor acting as a guide who can support or answer questions as necessary. Team Based Learning is an extension of this, which focuses on the idea of learners working in teams to solve problems. This approach lends itself to using online quiz tools and peer assessment platforms to enhance the learning process.
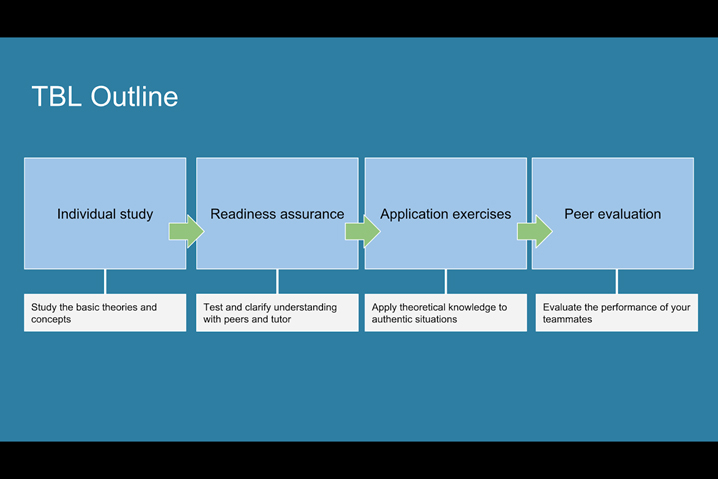
Figure 5: Outline of the stages of the Team Based Learning process.
The “How to” Guide
- The process begins in a way that is similar to traditional flipped learning. Subject content is provided for learners in a way which can be studied prior to the session. This could be text, video, audio, infographics or any other kind of multimedia. Learners are told in advance that there will be a multiple-choice test on this material when they arrive for class.
- In advance of the session, the instructor needs to create the multiple-choice test. This is generally the most time-consuming part of the process. Of course, you can do this using pen and paper; however, using an online quiz tool has the advantage that you can gather the data instantly and easily track progress over time. In terms of technology, you could use almost any online quizzing platform for this, and most virtual learning environments (e.g. Canvas, Moodle, Blackboard, etc) have this functionality built in. If you don’t have access to a virtual learning environment or prefer to use something different, Google Forms is a freely available tool which allows you to gather responses to a variety of question types, including multiple choice. I have used this for iRATS in the past and found it to be very effective for this purpose. In order to set up a quiz in Google Forms, you just need to have a free Google or Gmail account (which many people have already). You can then access Google Forms at http://forms.google.com.
- Learners study the material before class, then, as soon as they arrive for the teaching session, the first activity is to individually complete a multiple-choice test (Individual Readiness Assurance Test or iRAT) based on the pre-session subject content they were asked to study. The answers of the test are not revealed at this stage, because learners need to take the test again with their teammates during the next phase.
- Once the individual multiple-choice test is completed, learners then work in their teams (which are fixed groups of 5-7 learners) to complete the same multiple-choice quiz, but as a team (Team Readiness Assurance Test or tRAT). The key here is that learners must discuss and negotiate to arrive at a common answer. Some people use proprietary scratchcards during the process, so that each time the team guesses an answer, they scratch that answer off on the scratchcard and it will reveal whether or not the answer was correct. If they guess correctly the first time, they get full marks. If they guess right second time, they still get points, but these points are slightly reduced compared to a first-time guess. With each incorrect guess, the score reduces, so there is an incentive to get it right first time, but – in contrast to most multiple-choice testing – there is also an incentive to keep figuring the answer out even if you get it wrong the first time. To create a similar (but not identical) effect using technology, you could use a prioritisation question type, where learners need to reorder the answers in their order of correctness, such as the prioritisation question type in Poll Everywhere. Teams could them respond from their smartphones and the data could be used for formative assessment purposes. The scores for each team’s answer could be based on where they placed the correct answer in their prioritised list of possible answers.
- Following this team multiple choice quiz, the instructor reviews the answers to the questions and offers the opportunity for teams to pose written appeals to challenge the content of the quiz or any answers which they feel were unfairly graded. Crucially, the appeal must consist of a clear statement of argument and evidence from the pre-session preparation materials to support this argument. It is also important that these appeals are not read or discussed during the session. The instructor collects them up and reviews them after the session to help inform future iterations of the quiz. Again, these appeals could be gathered digitally using a tool such as Google Forms or Poll Everywhere.
- Once the written appeals have been collected, there is generally a short clarifying lecture. Rather than being a pre-prepared set of slides, this is an opportunity to address any gaps in knowledge revealed by the results of the quiz. Once these issues have been addressed, the instructor could once again use a student response system, such as Poll Everywhere, to check that understanding has improved since the quiz.
- By this stage, we have used various formative assessment strategies and supporting technologies to ensure that there is a relatively secure knowledge of the subject content. Now it is time for teams to work on Application Exercises, in which they apply the the subject knowledge to making a collective decision in relation to a problem. Team Based Learning uses the 4S model to describe the design of application tasks: they should pose a Significant problem; the problem should require a Specific choice among clear alternatives; all teams should be working on the Same problem; solutions to the problem must be reported Simultaneously. An analogue method achieving this is to ask teams to hold up their answers on mini whiteboards or a piece of paper. However, perhaps more effective is to ask teams to enter their responses using a tool such as Poll Everywhere or Padlet. The advantage of this is that all answers can be instantly collated in one place and revealed simultaneously to the whole class. It could also present the opportunity to discuss answers without knowing which team they were contributed by.
- The final stage is peer assessment, where learners anonymously assess the other members of their team in terms of one thing they appreciate about that team member and one thing they request of them. Ideally, this peer assessment should also contribute to learners’ final grade. In terms of peer assessment of projects, tools such as Peergrade can be useful to automatically handling the matching and distribution of information between learners within a group. However, many of these require a high fee to use. In terms of free tools, Teammates (http://teammatesv4.appspot.com/) is an useful tool which handles this matching and distribution, but also integrates features of Google Forms, which it is based on.
Benefits:
- Team-Based Learning provides a very structured way of integrating formative assessment into the teaching process.
- The approach is relatively easy to implement, as it offers a very prescriptive ‘recipe’ or framework for how to organise each teaching session.
- It develops cooperation and negotiation skills, as well as peer evaluation and critical thinking.
- Learners are more likely to complete the out of class work, because they know they will be tested when they arrive in the classroom.
Challenges:
- Preparation time is increased, as you need to prepare regular multiple-choice tests and think carefully about how you assign the teams.
- The structure could become repetitive, particularly if the content is not engaging, and because teams are supposed to stay the same throughout, learners may be deprived of getting to know and working with a wider variety of peers.
- The Team Based Learning community can seem a little bit evangelical and prescriptive about how Team Based Learning should be used, but my view is that you should feel free to adapt any approach to suit the needs of your context
5 Peer-observation: recording, sharing and evaluating experiences using mobile phone cameras and a Padlet wall
Overview
How can the recording and sharing capabilities of mobile phones be used to support learning?
One of the most effective ways for technology to support learning is through recording and sharing activities that are already occurring as part of the learning process. For example, Joan Williams, a Teaching Fellow in the School of Education and Social Work at the University of Sussex came up with a creative way to teach practical skills within a teaching session. During a class for trainee primary science teachers, she asked trainees to work in groups to complete experiments. Her idea was to have students carrying out custard-related experiments on different tables (the original teaching activity), but to ask students to record the process of each experiment with their mobile phones and share it to a Padlet wall so that every group was able to see the results and process of every other group.
The “How to” Guide
- After you have designed your learning activity, the first step is to create a place to share the recordings. In Joan’s case, she wanted to use text, photos and video to record each experiment, so she decided to use Padlet, as this allows you to create an online multimedia noticeboard where learners can collaborate and upload multimedia in real-time. You start by signing up for a free account or requesting access to a paid licence if your institution has a license for the paid licence (contact your technology enhanced learning team or equivalent for details). One you have Padlet account, you create a new padlet wall (the free account limits you to three Padlet walls at any one time, but you can backup old ones then replace them with a new one when needed). You can either copy the URL directly from the address bar in your browser or click on ‘Share’ and copy the link or embed code from there.
- You now need a method of sharing this link with your learners. You can do this by either pasting the link onto your institution’s virtual learning environment or send it to them via email or social media. Alternatively, you could use a URL shortener, such as www.tinyurl.com or www.bitly.com, to shorten the URL, then display this in your PowerPoint (or other) presentation. You can ask learners to type the shortened URL directly into the address bar of their web browser on whatever device they have access to. It is important to allow time and support to ensure that everyone who needs access is able to access the Padlet wall. Unless your specific activity requires access for every single user, in the case of face-to-face sessions, one device accessing the wall per group is generally sufficient.
- Once every group as access to the wall, take learners through a demonstration of how to post text, photos and other kinds of multimedia to the wall. Ask each group to post something to check that they have understood; this is also an opportunity to tackle any technical issues before the group activities begin.
- Now that each group knows how to post to Padlet, you can send each group off to start their experiments. You may want to assign roles within the group, to ensure that each learner has specific responsibilities that they are accountable for, but at very least 1-2 learners should be given the task of recording the experiment or activity in different ways (e.g. text, photos, video, audio, etc). As learners complete the experiment or activity at each station, they post their record of it to the Padlet wall, before moving onto the next station and repeating the process. It’s worth noting that Padlet has a feature where you can change the format of a wall. You access this by clicking on the ellipsis ‘…’ icon in the top right corner of any padlet wall that you have created and then choosing the option ‘Change format’. I would suggest using the ‘Shelf’ format, as this allows you to add columns, so that you can group information and media under a heading for each of the activities or experiments (see Figure 4 below). This makes it easier to compare results between different groups and keep track of large quantities of information.
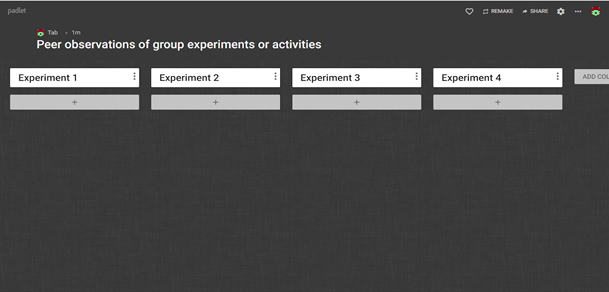
Figure 6: Padlet wall displaying an example of how you can use the ‘Shelf’ format to organise your information into columns for each experiment.
- Once each of the groups has moved around to each of the stations and completed the relevant experiment or activity, the Padlet wall should be populated with data from each group. You can then review and compare these results either in groups or as a whole class, using the Padlet wall on the projector or on learner devices to view the content produced by each of the groups.
- As an optional extra, in the settings for your Padlet wall, you have the option to enable comments and responses (e.g. likes, star ratings, scores out of 100, upvote/downvote). This could be a useful way to incorporate an element of peer assessment and feedback into the process.
- Finally, the products of this entire process (e.g. text, photos, video, audio, etc) can become a useful revision resource which can be repurposed for future sessions.
Benefits:
- Learners appreciate being able to see what happens in the other groups’ experiments. This enables them to compare how different processes lead to different results, and thus gain a deeper understanding of the key aspects of the experiment.
- What would be a very short-lived experience for a small group can become a learning resource which is accessible in the long term for everyone – even people who did not attend the original session!
- Creates an excellent opportunity and potential resource for peer evaluation.
Challenges:
- It’s important that you get the preparation steps right in order to ensure that the process goes smoothly. For example, in order to avoid the difficulty of learners typing the address into their browser, it is a good idea to send the link to students before the session begins. You could send Iit via email or post the link on a website or your institution’s virtual learning environment. To pre-empt technical issues, try testing it with another person before using it with learners. This will allow you to familiarise yourself with the process and ensure that you can tackle any potential problems in a risk-free environment.
- Because groups are working simultaneously on different experiments and using technology to record the process, it might be challenging to support learners with any problems which they come up against.
- As audio and video recordings require large file sizes, it will be important to have a good internet connection in order to upload them. However, if necessary, learners can record offline, then upload when a stable internet connection becomes available to them.
Conclusion
In this chapter, I have presented five approaches for integrating technology into your teaching. By providing a variety of options, it is hoped that every reader will find at least one or two approaches which can be adapted for use with their learners. When it comes to applying the tools and strategies in this chapter, my advice would be to put things into practice as soon as possible – preferably immediately. Try something, or even a part of something, in your next teaching session. After all, it is much easier to keep momentum going than it is to get the ball rolling in the first place.
It is also worth mentioning that any book chapter concerning technology is likely to become out of date by the time it is published, as will be the case with some of the information I have provided about learning technologies in this chapter. The key thing to take away is the approach and general principle of what is described here. My approach is to keep developing my understanding of teaching and learning technology by consulting with colleagues, learners and online sources of information such as blogs and social media accounts. When I don’t know, I just ask. However, perhaps the most useful of all is to get in the habit of searching for what you need. For example, if you need an online quizzing tool, do a search for ‘Top 10 free online quiz tools’, briefly compare 2-3 lists, then try whichever tool appears in a high position on all of the lists you have checked. I often use this approach and have found some great tools this way.
Finally, don’t underestimate the power of sharing ideas. Be prepared to listen to colleagues, learners and other sources of information, but also be prepared to tell them about your own successes and challenges in relation to pedagogy and learning technology. Keep pushing yourself outside your comfort zone and keep trying new things. If we expect this of our learners, then it is only reasonable to expect this of ourselves too. When you try something new, share your story with those in your local community or with the Active Learning Network to help encourage pedagogical exploration and experimentation, but also to learn from each other about how we can overcome obstacles and setbacks.
Although the landscape of the future presents a plethora of protean and unknowable possibilities, there is no need to ‘keep up’ with it: as long we keep walking forward, with our head up and our active learning mindset engaged, then we can make use of the opportunities which are available to us. Whether this is your first step, or simply a step forward, may the ideas in this chapter provide some inspiration and make your journey of a thousand miles feel a little shorter, more enjoyable and more achievable.
